Tonight we had a little Mexican Fiesta. Chili spiced chicken, creamy guacamole, sauteed veggies and salsa. It was almost as spicy as a party during Cinco de Mayo in Detroit's Mexican Town. Well, not quite but the food was good. And healthy!
So sorry but I didn't take pictures so you will have to use your imagination for this recipe.
If you don't have all of the ingredients that I list, get creative and use what you have. I will give you some substitution ideas at the end of this post but in the meantime, I will list exactly what I used.
Ingredients:
3 Chicken Breasts Diced
4 Large Mushrooms Sliced
1 Red Pepper Diced
1 Green Baby Zucchini Sliced
5 Stems of long Green Onions
2 Avocados
3 Tablespoons of No Fat Plain Greek Yogurt
4 tablespoons (divided into two) of no fat Balsamic Vinaigrette
Garlic Powder (as much as you'd like)
Thyme or Basil (if you'd like)
Chili Powder (as much as you'd like)
Sea Salt and Pepper
Salsa (Mild El Paso is our fav)
Whole Wheat Tortilla's
Low Fat Mozzarella Cheese (optional)
Place 2 tablespoons of the dressing into pan with chicken, shake on some garlic powder (I use a lot), thyme or basil, a bit of pepper and cook thoroughly on medium-high with lid on to sweat all of the juices out. I can't stand juicy meat so I always over-cook the bird. I'm sure you know how to cook chicken, so do yo thang and cook it how you like. Just before it's done (I prefer golden brown edges) add the chili powder, a couple tablespoons of water, stir and cook until all of the water is gonzo.
In another pan, or pot, or wok, or whatever add the other 2 tablespoons of dressing and the red peppers. Cook on medium until they start to soften. Once the peppers are slightly soft, toss in the mushrooms and put a lid on the pan so that the juices from the mushrooms sweat out. Once they are close to being done, add the zucchini (lid still on), sweat them out and then add the green onions. Cook until veggies are soft.
While the Chicken and Veggies are cooking, de-pot (which is what I call it) the avocado's and place in a bowl. Mash them up with a fork and add in the plain Greek yogurt. Stir, stir, mash, mash. Sprinkle in a bit of sea salt and pepper and you're done.
Place a tortilla on a plate, add some guacamole for glue, chicken, veggies, salsa and a bit of cheese, wrap it up and eat!!
Healthy and soooooo Yummy!!
Substitutions:
If you don't have balsamic vinaigrette, use some Italian dressing or mix up some EVOO, a bit of vinegar and spices.
If you don't have any Greek yogurt, mix equal parts of no/low fat mayonnaise and no/low fat sour cream with your avocado. You could even dice up some tomatoes and sprinkle in some fresh lemon juice for a more authentic guacamole.
Cook up whatever veggies you have - Onions, carrots, broccoli, mushrooms, peppers, eggplant, or even spinach!
No chicken in your freezer? Use beef or shrimp!
No tortilla's? Use pitas or flat bread!
I find that people tend to follow recipes the same way that they follow directions to an unknown destination. They often become afraid that if they fall of the recipe track that what they are cooking won't turn out. I can honestly say that getting lost in my recipe kitchen has always ended up in a delicious adventure. I personally think that I suck at baking because I have a really hard time following the directions of a recipe. I like to break the rules and improvise when I cook and unfortunately there is no improvisation in baking. Hence the reason that I am a terrible baker but a (self-proclaimed) amazing cook.
So get creative and fiesta, my lovelies!
xTx

Tuesday, February 21, 2012

Monday, February 20, 2012
President's Choice Greek Yogurt
 Before I go to bed I wanted to share a product with you that I am absolutely in love with. When I say I'm in love, I mean, literally - I love this product so much that if it put a ring on my finger, I would have to say "YES"! It's so, so, so good.
 President's Choice Greek Yogurt.
Three syllables.
OH - EM - GEE!
As I mentioned, I started training a bit ago and my Trainer (who I refer to as Momma Joe) insists that I eat carbs during the day before I head to the gym for my hour long training session and a whole lot of protein after. Normally I eat chicken after I train but after a suggestion from Momma Joe I have discovered the beauty of Greek Yogurt.
I have tried a couple of different types but the President's Choice Greek Yogurt is by far my favourite. It's about $3.99 per tub and can be purchased at the Independent Grocer or (I'm sure) any other store that sells President's Choice products.
It's so thick and creamy and so delicious! Not overly sweet, bitter or thin like most yogurt's. Not only does it taste wonderful but 3/4 of a cup of the vanilla flavoured yogurt is packed full of 18 grams of protein (that is almost as much protein as a steak and a perfect after-training snack!!), only 160 calories, 23 carbs and ZERO fat. That's right! ZEEEEROOOO FAT!
The vanilla and honey flavours are my favourite and quite frankly, I don't think that I will ever eat another type of yogurt again.
You must try some! Guilt free!
xTx
Chicken & Broccoli 1 Pot Meal
 I stopped drinking soda's and juice on December 7th, 2011 and haven't looked back. This was a huge step for me given that most of the fluids that I used to take in on a daily basis were juices and ginger ale. Now I only drink water, herbal tea and coffee (normally one or two a day with milk).
I started training with a Personal Trainer a few weeks ago and since doing so, we have been creating really great low fat recipes. If I told you that we didn't use anything white I would be lying because along with brown sugar we do use white sugar in our coffee and tea; but we don't use anything else that is "white".
Our staples consist of whole wheat pastas and rice which we only eat a couple times a week (that is as starchy as we get), rye bread, chicken, turkey, lean beef, a ton of veggies, fruits, regular mustard, dijon mustard, balsamic vinegar, sea salt and pepper.
Since my training began I have managed to drop 15lbs - Which I am very excited about!!
We eat a lot which is nice lol. We eat breakfast, lunch and dinner and snack in between breakfast/lunch and lunch/dinner, trying not to eat anything after dinner. Eating a low fat small meal or hearty snack every couple of hours helps to keep your metabolism up which in turn helps to burn more calories and fat. Trust me, I'm not a nutrition expert or Personal Trainer but I'm very fortunate to train with a woman who is a Registered Nurse and fitness guru. She is my amazing source of information regarding all things healthy.
Tonight we threw together a really good meal in a matter of about 20 minutes and we only used 1 pot. I would say that this pot of goodness made about 8 portions (maybe more) because we have a ton left over for lunches and probably dinner tomorrow.
2 Bunches (6 stems) of Broccoli (we always use extra broccoli because Baby Girl loves it so much)
1 Red Bell Pepper - diced
1 1/2 Cups of Sprouts1/4 Cup Fat Free Italian Dressing
2 Cups Instant Brown Rice
2-3 Cups of Water
As much Garlic Powder or Fresh Garlic that you choose
1/4 Cup of Cashews (Clearly not low fat but optional) Pour Italian Dressing and diced Chicken Breast into large pot and cook on medium-high until done.
Add Garlic Powder or freshly chopped Garlic, Water and boil on high.
Add the Brown Rice, Sprouts, Bell Pepper, Broccoli and optional Cashews.
Cook on medium-low with lid on until all water is absorbed.
Serve! (You could sprinkle on a bit of sea salt and pepper to taste if you'd like)
We had this meal with a Baby Spinach Salad topped with thinly sliced apples, mushrooms and a few rye croutons. As per normal, I made the dressing from olive oil, dijon mustard and balsamic vinegar. Delish!
I <3 1 pot meals!
I hope you all have a great week!
Sunday, February 12, 2012
Five ★ Sunday - Malibu C Scalp Wellness Shampoo and Conditioner
 When I think of Malibu, California I let my mind take me away with thoughts of crystal blue water, rolling white waves, warm sand between my toes, the smell of salty sweet air with hints of coconut tanning oil, pineapple rum drinks with little pink umbrellas and my hair blowing on a warm beachy breeze. Although I have never been to Malibu I have had the opportunity to travel to California quite a few times in my life and I must admit, I absolutely love it there. Cali sounds so dreamy right now given the crisp white snow and slick ice that I can see from my office window. Cheers to our Canadian winters - *sigh*.
 To start with, this shampoo is absolutely divine. Like most people (I'm sure?) I always wash my hair two times when I am in the shower. The first time is what I like to refer to as the surface clean. The second wash is the deep clean. If you're like me, you will find that no matter what shampoo you use, the lather during the surface clean is never as thick and foamy as you like. Shampoo's always seem to lather thicker during the second wash once you have cleaned the surface of your hair and scalp. That's definitely not the case with this shampoo. The Scalp Wellness Shampoo is so thick and creamy, even during the surface clean. The deep clean is a whole other story! The super clean feeling that my scalp and hair is left with immediately after washing is simply out of this world.
Now, the conditioner - So, so cashmere creamy. It doesn't weigh my hair down and all I am left with is silky soft and smooth, shiny, shiny (did I mention shiny?) locks from root to tip! After I use this conditioner, I can literally run my fingers through my hair to comb it out while it is still wet, which is not something that I am usually able to do unless I deep condition.
 Not only does the Scalp Wellness shampoo and conditioner define all things good for my scalp and hair but it smells like spearmint gum which I love!
The Malibu C Scalp Wellness shampoo and conditioner are not only specially designed to control and prevent many scalp issues but they are 100% vegan. They aren't 99.9% vegan, they are 100% vegan.
They are sulfate-free and full of vitamin E, plant based proteins, aloe and many other delicious ingredients that our scalp and hair require for health and longevity.
If that isn't enough, my two other favourite perks about the Scalp Wellness system is that it's so gentle it is perfect to use on babies (assisting with cradle cap) and the shampoo can also double as a body wash to help prevent dry skin.
Having said that the shampoo can be used as a body wash, I will confess that I used the conditioner to shave my legs. When I got out of the shower, my legs were so soft that I didn't bother putting cream on them. I love that!
So, if you're craving a trip to Malibu but aren't able to make it there, I suggest that you take your hair on a minty trip to Malibu instead. Lounge back in the warm sun, watch the waves, sip on your umbrella drink and feel your pretty hair blow in the salty sweet breeze. But don't forget to pack your Malibu C Scalp Wellness shampoo and conditioner!
xTx
A special thanks to Malibu C for taking such great care of my hair! Not only are the products amazing but the very dedicated people behind the products are too!
Monday, February 6, 2012
DIY - Re-vamped Melamine Bookshelves
My first Chalk Paint bookshelf is complete. Below are some pictures of my new beauty!
Here you have the ugliest melamine "wood" in the world. Disgusting. But not for long!

To begin, I painted two thin layers of my fancy DIY Chalk Paint over the entire shelf.
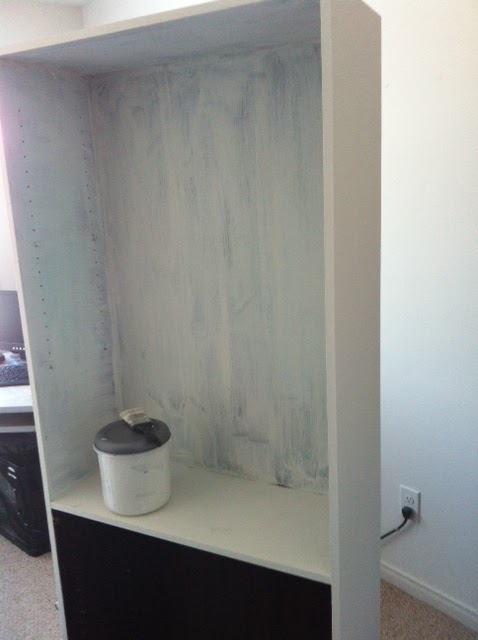
After the two coats of white were dry and complete I went in with an aqua (that looks way brighter in photo's than it does in real life) and distressed the white edges and sides with sand paper.

Below you can see the finished product empty and with a couple shelves of books. Chalk Paint sticks to melamine like glue!! I can only imagine how well it works on real wood!! Clearly, this makes my painting opportunities endless!!


Happy Monday!!
xTx
Sunday, February 5, 2012
Sunday Night Lesson: Never Give Up!
 Last Sunday I hurt my back really bad when I was trying to lift one of the bookcases that I am working on. I don't know technical terms, but I popped some sort of muscle on the left side of my back behind my lung. I couldn't sit, stand or lay down without being in a whole lotta pain. This pain honestly hurt more than anything that I endured during my 18 hours (without an epidural) of labour when I had my daughter. No joke.
 My back injury kept me from going to the gym all week long which was really upsetting. Even though I was unable to work out, I felt so guilty that I couldn't be active.
My back is better now but I felt so down about missing a week of working out that I wanted to give up and I was trying to come up with any excuse possible so that I didn't have to meet with my trainer today. Given that I was excuse-less, I fought off the negativity and hit the gym for two hours.
I did 35 mins of cardio and trained the rest of the time. Getting on the weight machines made my body feel so good! It felt great to be back sweating my ass off! It also feels great that my trainer is so impressed with my lower body strength. I can lift 160lbs to 175lbs with my lower body. Although my lower body is strong, I am a weakling when it comes to my arms - I can't even curl 12 reps of 40lbs! Ha Ha Ha! I definitely need to work on that.
I am so glad that I pushed myself and didn't give up today. The feeling of success is very powerful.
If you feel like you want to give up, don't. No matter what your goal may be; stay focused, stay strong and stay in control. Your mind, body and soul will thank you.
Never, never, never, give up.
- Winston Churchill
xTx
Saturday, February 4, 2012
Squash Soup for the Soul
 I have had two butternut squash sitting on my kitchen counter for weeks waiting to be cooked. I love that squash have such hearty lives - They seem to last forever!? I also love squash soup. Especially on a cool winter's day.
I cook a lot but I have never made squash soup before. Normally I would have Google'd a recipe for it but today I decided to try my hand at making it sans Google search.
It turned out so delish, I thought that I would share the recipe with you!
8 Cups of Chicken Broth (I had the broth saved in our freezer from a roast chicken that we cooked in the crock pot last week)
4 Cups of Water
2 Butternut Squash (peeled and cut into cubes)
3 Large Carrots
5 Stalks of Celery
2 Medium Yellow Onions
Salt and freshly ground pepper to taste
Bring the broth and water to a boil, add all of the veggies, continue to boil until veggies are very soft (approximately 20-25 mins) and then remove from heat.
Fill your blender jug with 3/4 veggies and enough broth until it sits at the half way mark.
Puree on high until smooth.
Pour the soup into a large bowl or another pot and repeat the process until you have used all of the veggies up. You may have some broth left over which you can either freeze or toss out.
I'm not sure how much soup this recipe made but it made a lot! It was a huge hit with Babygirl.
xTx
Friday, February 3, 2012
DIY Chalk Paint
After I discovered that the only Chalk Paint supplier in Ontario (Bath, Ontario to be exact) sold Chalk Paint for about $45/can I resorted to figuring out another way to satisfy my Chalk Paint craving. What does a girl do in a time of obsessive need? She finds a way to do it herself! DIY, ladies, DIY!!
So, clearly I have never had the blessed opportunity of experiencing Annie Sloan's Chalk Paint, therefore I have no idea if my creative paint making skills are mastered but my Google searching definitely makes me believe that my paint is just as grand (sorry, Annie Sloan).
The piece that I am working on is one of two large bookshelves (the Ikea Billy bookcase type) that I scored on Freecycle (for FREE) some time ago for my home office. They are a super ugly! Super melamine! A disgusting reddish-brown colour! And both are in definite re-vamp need.
My DIY Chalk Paint consists of 2 ingredients. Wall paint and baking soda. That's it. That's all.
I mixed 5 cups of white paint (C.I.L. Dulux Interior Semi Gloss in white) in a plastic container and added approximately 2 cups of Arm & Hammer baking soda. Be sure to sprinkle the baking soda in a bit at a time and stir like cray-cray to ensure a smooth consistency.
The great thing about Chalk Paint is that there is absolutely no prepping to be completed before the paint process. You just slap it on! No sanding or priming is a bonus in my books.
The paint is fairly thick and dries quick so you want to work semi-fast. After the first coat you may see some lines but once the second coat is complete and dry, the lines will disappear.
After it's dry, the paint may feel a bit gritty to the touch but a light sanding will smooth everything out. The paint turns to dust when you sand so don't over do it unless you are going for an extremely distressed look.
Apply the wax of your choice, Minwax, Beeswax, what ever you wish and voila!
Simple, super cheap and easy!
I'm loving my chalk paint! This week I found a beautiful old desk on Kijiji (for FREE) that I am going to distress to match my shelves.
Happy Painting and Happy Friday!
xTx
Subscribe to:
Posts (Atom)